940 M90 Swap, Step by Step
NOTE: I wrote this on Turbobricks in 2019. It may be somewhat outdated and also reads… like a forum post. BUT there is still a lot of useful information here.
Well, it seems like it's about time to start writing about the transmission swap. I'm planning on this being a guide for "proper" execution of the swap, with part numbers/sources/prices so it may take a while.
Note: I got a somewhat comprehensive M90 setup from Classic Swede, which included the M90 (a 97 M90L2), clutch fork, clutch release bearing (knackered but comes into play later), giubo, driveshaft front half, RHD pedal box, master cylinder, slave cylinder. This ran me about $800 at August 2018 exchange rates. I found this by attempting to contact literally every M90 seller on the Internet in the hopes they would ship their setup to me. Despite the oft-repeated "you'll never find one" stories it took not more than a week or two. My strategy was to contact as many foreign salvage yards as I could find as well as private sellers on Tradera and Blocket, the Swedish equivalents to our eBay and Craigslist and a reliable source for pretty neat stuff for our cars. Our very own DET17 actually contacted me with a complete setup but the price scared me off. Of course, I ended up paying an almost identical amount anyway and likely did it with exactly the same stuff. Oh well. Anyway, on to the swap...
Start by jacking the car up. I put it on jackstands in my parents' driveway. It was like this for about six weeks. They're very kind. A lift would be nice but is not strictly necessary (obviously).

My dad and I did this together and with two people and a nice weekend I think you could get it done in a weekend, if you were ABSOLUTELY certain you had everything you needed and did nothing else that weekend, working during all hours of daylight. I guess if you want something cool like an M90 you have to work for it. Now, on to the process...
Pull out the drain plug, then disconnect (destroy) the transmission cooler lines, then drop the transmission pan and finagle it in such a way that additional ATF comes out. I waited 24 hours between each of these steps to allow for optimal draining. Regardless, there was always more ATF to get on myself. You will ruin your work gloves. Resistance is futile.

Next up is to pull the aluminum piece from under the oil pan, as well as unbolting the torque converter and driveshaft. The converter bolts came out using a wrench, with a breaker bar on the crankshaft to stop the engine from turning. It just so happened to be exactly the correct length to rest on the frame rail when turned appropriately while I had it on the crank pulley. A second person being there would have worked just fine as well. As the pinion seal, center bearing, and center bearing support in my car were done at the same time the whole driveshaft came out. It was first undone at both ends before the center bearing support was removed in the middle by my dad while I held the two halves of the driveshaft together. The new front half got a new bearing pressed on offsite, as well as a new giubo and center bearing support. I combined the newly refurbished front half with the old rear half, resulting in absolutely zero driveline vibrations. The halves are balanced independently.

Parts featured up to this point:
M90 takeoffs from RHD car, used, £670 including freight ($807 at time of purchase) from Classic Swede
Pinion seal, SKF p/n 942905, $13.78 from FCP Euro
Driveshaft center bearing, FAG p/n 183265, $31.32 from FCP Euro (with support) for 50.8mm driveshaft, I found that there were two different available diameters so measure yours before buying!
Driveshaft center bearing support, Febi Bilstein p/n 1340501, $31.32 from FCP Euro (with bearing)
Driveshaft giubo, Febi Bilstein p/n 26117511454 (actually a BMW part!), $40.84 from FCP Euro
Price so far: $892.94
The next thing I did was disassemble the inside of the car. I pulled the AW71 shifter bezel out, like so:

And disconnected the shift linkage, luckily not breaking anything but I definitely came close. I bought an M46 shifter bezel from philski o'flood here on the forum (paid $35, Volvo P/N). The M90 bezel has a different part number (edit: I just checked the parts book and this is NOT true), however I do not notice any incompatibilities or strange fitment issues with this piece, which is a lot simpler to track down in the US (turns out it's because the parts are the same). See for yourself:

While in the car I completed the electrical component of the swap. I connected the pink and blue wires to defeat the starter inhibitor switch and load signal to the ECU. I used the male end of the connector, depinned what I didn't need, and crimped the two wires together with a butt connector that I then shrank down with my soldering iron.

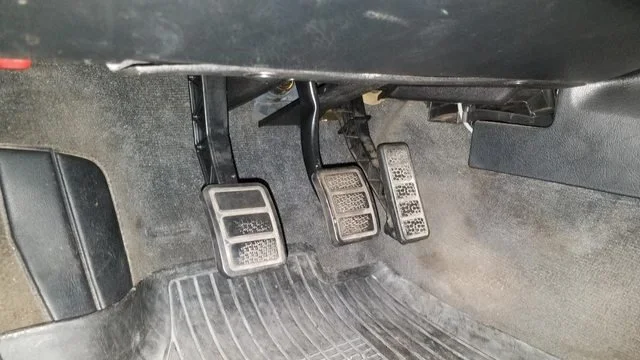
Next up was the pedal box. In my opinion this was the most unpleasant part of the swap. I started by first disassembling the driver's side lower interior and putting it in the trunk.

Next I mocked up the pedals that came with the stuff I had bought from the UK and immediately realized that this would absolutely not work. There's no photo here because I couldn't even get the pedals in there. The brake pedal ended up somewhere low and behind the accelerator, and I didn't even bother trying to fit the clutch pedal. Not to mention that since this brake pedal was from a 95+ 940 it was designed for the later brake booster setup and has a higher clevis.
I bought a new LHD clutch pedal from Volvo for a hydraulic clutch 740 ($38.21), and searched for about a month for the correct brake pedal to no avail. It's alright, I will make do. First, my dad and I measured the pedal spacing on his 240 (50 mm edge to edge in both pedal gaps, with pedal pads on) and replicate it on my car. The first issue we ran into was that the 7/9 pedals are spread further apart. We would be aiming for 60mm gaps between pedal pads instead to keep spacing equal. If anyone has a factory manual 7/9 I'd be curious to see what the OE pedal spacing is. Anyway, we hatched a plan: We'll simply go ahead and cut the auto brake pedal such that the pad is normal for a manual transmission car.

Perhaps not. The pedal is so wide and off to the left that if you were to bolt it in it would just touch the edge of the clutch pedal. Not to mention that the way the pad mounts to the rest of the pedal is unfavorable to keeping the brake pedal pad further from the clutch pedal pad. The shaft(?) of the pedal would have to be bent to taste in a press.

After discussing the matter at length, and realizing the pedal shaft geometry was surprisingly complex, we decided to effectively "un-bend" the original pedal, or more correctly create a new bend in the opposite direction. Next was to cut up the pedal pad, and here we got lucky. It turns out that an iTunes gift card has the exact width and height of a RWD Volvo brake and clutch pedal pad. I rounded off the corners of the gift card to match the pedal pad and placed it where it needed to be, then cut off the unnecessary material with a Dremel and sanded the edges down until I couldn't cut myself on it no matter how hard I tried. The final pedal setup is as follows:

I would have had to buy two brake/clutch pedal pads but I found a pair in the garage.
Parts featured up to this point:
M46 shifter bezel, bought used here, Volvo p/n 1348166, $35.00
740 clutch pedal, Volvo p/n 3530634, $38.21
Butt connector, Molex p/n 0191640013, Digi-Key, $0.88 but who buys a single butt connector
(Brake pedal pad, Febi Bilstein p/n 1272021 x2, $2.29)
Total so far: $967.03 ($971.61)
In the process of mounting the clutch pedal, I undid the two nuts holding in the master cylinder cover, which is glued in. I poked it with a screwdriver until the adhesive failed. It was pretty easy. I'm pretty sure I took a picture of this area at some point in the process but I can't find it at the moment. I'll add it if I find the pictures. The master cylinder got bolted up (it's very tight in that area, kind of difficult to get in there but easy to tighten once it's in there) and it was time to pull the AW71.

This stuff went on all the questionable New England hardware on the underbody. Thankfully, no hardware was harmed in this process. These cars are made from very good stock, and I've never had trouble with Volvo hardware in the various 240s I've spent time with. Dad's wagon is from California so that's not really remarkable but a few of the Lemons car donors and race wagon Mk 1 were very dubious in terms of rust. Anyway.
We started by lowering the drivetrain as much as possible. Be careful not to bash the distributor on the firewall, because you can lower it too far. We undid the crossmember bolts and used a floor jack to maneuver the drivetrain. Next was to undo the top bellhousing bolts. A 3ft extension had to be purchased for this part. The crossmember bolts went back in while the rest of the bellhousing bolts were removed. Then, the crossmember itself was removed to make moving the transmission around with the floor jack easier. Lots of tugging later and the engine and transmission were split. Don't let the converter fall off. This one didn't, thankfully. The AW71 went into my garage, and later into a friend's 244.
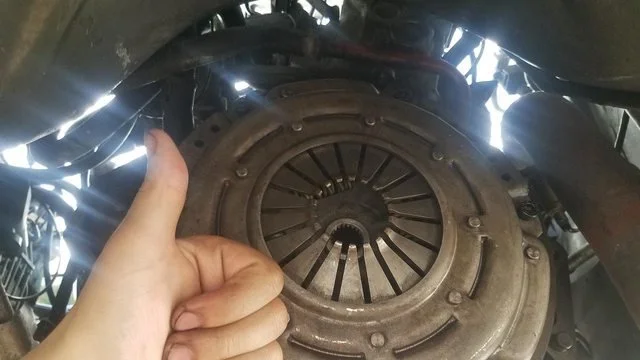
Next off was to remove the flexplate. It came off very simply. I bought a dog dish flywheel in decent shape off of the forum (well actually my dad did, I got it for Christmas because that's how we roll in this house), used a Sachs 740T pressure plate we had lying around, and bought a Sachs 940 TDi clutch disc from KG Trimning in Sweden along with a slave cylinder rebuild kit (went unused) and a reverse light switch, which went on the transmission while it was out. Total outlay was $279.14, or $383.61 if you didn't have the pressure plate.
Flywheel bolts were tightened in a cross pattern, to 70 Nm as specified in the greenbook. I had to buy a universal clutch tool for clutch alignment to work with the Retroturbo pilot bearing adapter. The tool is basically a big cone that you push against the setup as you torque the pressure plate bolts (25 Nm, greenbook spec). Somehow, I managed to nail this on my first try. I also had the pressure plate fall on my head at one point. Such is life.
Almost there!
There was a slight complication with the bearing on the Retroturbo piece. My input shaft was juuuust a little too big to fit in the bearing. We solved this by turning the transmission with a drill while using emery cloth on the tip of the input shaft until it fit, losing about 2 thou of input shaft in the process. Not a big deal, really, but not as good as getting a part that just worked. To be fair to them, they do mention this possibility on their website
Next up, the final installment and the thoughts so far, now that I have about 5000 miles on the swap. Plus I can finally start to catch up to present day.
Parts featured up to this point:
LH 2.4 dog dish flywheel, purchased here, $130 inc freight
940 TDi clutch disc, Sachs p/n 18 1862 468 031, 1036 SEK + 232 SEK freight
M90 reverse light switch, Volvo p/n 104 SEK (Swedish stuff totals $141.25 at time of writing)
Pilot bearing adapter, Retroturbo, £72.49 inc freight ($92.15 at time of writing)
(740 Turbo pressure plate, Sachs p/n 1209874, $104.47)
Cost so far: $1330.43 ($1439.48)
I added the parentheses to account for stuff I had around, that you the reader may not necessarily have around.
I have a TDI clutch in it, with the weaker of the two pressure plate options. Not to say that I won't ever be needing another one at some point. The pedal is so soft with the stock pressure plate that sometimes it'll make me worry I blew a line. No air bubbles, just much softer than the M47 cable clutch I am used to. I went through our local Autozone's supply of Pentosin DOT-4 when I did brake+clutch fluid in this car. It probably would have made sense to make at least some sort of attempt at filling the master and slave cylinders with fluid beforehand. A minor error really.
So, let's see where we were. It's been a while so I can't find all the photos right now but I'll try to recount what happened in the final steps of the swap. I missed this last time, probably since it wasn't part of the manual swap, but the car got a rear main seal and an oil pan gasket, both OEM if I recall correctly, while I was in there. Either OEM or Elring. Not sure.
I first started to mount the gearbox in the car by allowing the M90 to sit under my at least mildly neighbor-angering 944 (the car had been on jackstands for weeks on end while it rained and rained and rained here in Massachusetts, this is in about April).
Waiting for hours and hours and even playing some particularly sensual Marvin Gaye was not enough to get the two to mate on their own. This meant that my dad and I had to wrestle the transmission in on a floor jack under the car. I steered the jack and my dad steered the transmission, soon enough the two were together, with engine bolted to transmission and floor jack serving as impromptu crossmember. I reused the AW71 crossmember, but not the rubber mount which had split in two in the prior years of neglect. Explains why the shifter moved so much. I bolted the mount onto the transmission and then loosely connected the lower part of the mount to the crossmember, allowing for some flexibility in running the mounting hardware through the previously unused nuts on the body whose threads had been exposed to New England winters for some 25 years. I had concerns about this part but everything went together as it was supposed to. The bolts threaded in as if the car was only a couple years old. Of course, while the transmission was out I wire-wheeled what rust I could see and undercoated, as you can see in this picture of the assembled system:

Next up was to mount the shifter, which I cleaned up and lubricated with GM Lubriplate before mounting, as well as replacing the plastic bushings with OEM parts:

I threw some of the above stuff on every metal on metal contact point after cleaning both surfaces thoroughly, including that little shifter pin you see there. This includes the clutch pivot fork, which I initially only spaced out a little bit. FOR THOSE USING THIS POST AS A REFERENCE THE CORRECT NUMBER IS 6MM OF SPACER ON THE FORK PIVOT BALL!!! DO NOT MESS THIS UP!!!

I paid particular attention to the ball and cup here, assuming it was the main bearing (heh) on shifter feel. Then I mounted the whole thing, like so:

Careful not to ruin the foam/carpet that goes between the shifter trim and the body. Mine was particularly dainty, yet effective. I drove around with the shift knob looking quite shabby like this for a while before finally giving up my search for the plastic shift pattern and simply buying an 850 shift knob off of eBay. The plastic was loose on the knob I bought so I glued it on rather than dealing with the same problem after the ordeal of removing an M90 shift knob. Look it up. It's terrible. Most people end up cutting the whole thing in half.
Here's where the pictures get scarce. I finagled the clutch line into position (a difficult challenge for even the small-handed such as myself) and snap-ringed the slave cylinder into place. Not too bad. I got the clutch line and associated rubber bumper for Christmas. To plumb the clutch hydraulics into the rest of the car, you simply cut the strange little tab on the brake reservoir open and connect a hose between there and the master cylinder while all your brake fluid falls out. It's difficult. I cut the reservoir in such a way that left a little bit of the barb remaining and used a pair of little green Volvo spring clips that were in the garage to retain the hose. Then it was time to bleed the clutch. We found the best method was to pump the clutch pedal ten times and then bleed, followed by manually returning the clutch to its resting place. It was time consuming and took a lot of brake fluid. Then, we installed the driveshaft, and as it was getting dark it was finally time to run the car again.
I started the car for the first time since the swap (about two months) and it... acted really strange for a bit. It smoked. It made sounds. But then it got up to temperature and all that nonsense stopped. It hasn't done it since. No sweat, I guess.
I drove it a couple hundred miles the next week or two. Then, while starting the car in Lowell, the clutch lost pressure and the car jerked forward. Strange. I was able to pump a few times and regain pressure, before losing it again. Hmm...
I looked under the car. A puddle under the slave cylinder. Not so good. I found that the boot had swollen full of fluid and was acting as an impromptu seal. I waited for favorable traffic patterns, then limped the car home. I drove some 40 miles only using the clutch seven times.
It was resolved that my slave cylinder was no good, and "while we were in there" it would probably be smart to space the pivot ball out a little more. I found a spacer at my local Ace Hardware that measured in at 1/4" and stopped me from using a big pile of washers, which would have been terrible. More clutch bleeding ensued, but the car hasn't had a problem since. Hopefully this write-up is good enough to be used as a reference for those who are interested in this swap and have questions like "where do I get parts?" or "how much will it cost?"
Thanks for reading!
Parts featured in this segment:
Transmission mount, Febi Bilstein 1328900, $14.08
Shifter bushing, Volvo (x2) 1209638, $2.82
Shifter o-ring, Volvo 1232595, $4.99
Shifter bushing, Volvo (x2) 3520197, $2.82
Clutch line, Volvo 3520525, $103
Clutch line bumper, Volvo 1330129, $7
Slave cylinder, FTE 1273681, $89
Volvo 850 shift knob, eBay, $70
GRAND TOTAL TO PUT AN M90 IN YOUR 940 THE "RIGHT" WAY IN THE US: $1738.83
maybe you won't have to buy a second slave cylinder and shift knob though

